About Me

My photo
From Rugby, Warwickshire;Went to Marlborough Secondary School;Studied at Rugby College of Engineering Technology;Worked at HM Forces - British Army;Studied at Royal School of Military Engineering; - Former Training Officer RAFVR - Maintenance Technician at International Computers Limited;Former IT Support at GlaxoSmithKline Pharmaceuticals Ltd;Lives in Letchworth

Pages

Thursday, 23 July 2026

40 foot Bailey bridge


21/07/2026

40 foot Bailey bridge


Being an ex Royal Engineer in the 60-70’s and built these beasts for real it was only fitting I should make one. I found some files in the web for a 1:100 scale bridge. That was the staring point each file way re-drawn to 1:76 scale by 131.57%.

The components parts were merged in the 3d print slicer to form one side of the bridge. Both sides were assembled in a card jig to make sure the transoms aligned correctly. 5 stringers were fitted to each bay 30 in total.

I use EMA plastic weld to join my PLA printed parts. The chesses are actually printed as a block of 13 I felt this would give the structure one strength.


Moving on


20/07/2026


Moving on

It’s been a while since my last blog post — life’s been busy with a mix of projects and a couple of brilliant holidays to Norway! Back on 22 March 2025, I treated myself to a Bambu Lab A1 Mini 3D printer and promptly fell down the rabbit hole of learning CAD.

3D printing has opened up a whole new world for my modelling. I’ve been churning out wheelie bins, station waste bins, skips — you name it. By spring 2026, though, I’d definitely outgrown the little A1 Mini, so on 25 June 2026 I upgraded to the full Bambu Lab A1.

I have to say, 3D printing is seriously addictive. Once you start, it’s hard to stop!

Thursday, 14 August 2025

New storage sidings coaching stock

13 August 2025

After long deliberation as to where I could site some storage sidings for my coaches; I decide to expand the site adjacent to Westernhills MPD. 2x 4 foot by 6 inch boards were constructed and fitted to the main board.  Due to the mini heat wave work was suspended at 14:15 


14 August 2025

 Work restarted at 10:30 on the storage sidings first a cut though the rails where the new turnout will fit; then a liberal spray of water to soften the glued ballast; with the track pins removed the old track is lifted. I cut the rail slightly under size to enable me to fettle the new turnout into position.  Next job is to clear the debris from the base board and test fit the turnout I had to remove a small amount of rail to ensure a neat fit. Holes are marked for the point motor actuating pin and for the frog wire.

17 August 2025

 Turnout fitted and Cobalt iP Digital motor fitted wired and tested; a power buss fitted to new section holes for droppers drilled. 

19 August 2025

After a pause its still 30c 41% humidity in the loft I laid the 1st 4 foot of track. Wired up the turnout in the siding to a DPST switch and laid the remaining track.

With the entire track laid cut at the 4 foot board joint all was left was to ballast. Ballasting was completed and glued with 50% PVA; and left to dry overnight.20 August 2025

Vacuumed up Excessive ballast before I air brushed a light coat of black acrylic paint to darken and stain the track and ballast; 


Continuing with the landscaping by blending static grass. Work on hold whist I get fresh supplies of static grass.


31 August 2025

Continuing on with the landscaping with a new batch of static grass 4mm Wild Meadow, 6mm Wild Meadow and 6mm Autumn Mix a smattering of soil (dried teabag) and ballast shows though. a small Ratio hut with the front remove conceals the point switch. All that is needed now is suitable ‘junk’ for set dressing LOL.


Tuesday, 29 July 2025

Accurascale Hill J68


Pix Valley announces their latest arrival, in pristine condition after another extensive overhaul into full running order straight from the factory is an Accurascale Hill J68. BR Late crest Plain Black; what a delightful little locomotive, stunning detail dynamic sound smooth running right out of the box.


Saturday, 15 March 2025

Bachmann / Model Rail USATC S100 Tank sound fitting

 This is a very straight forward installation; 2 screws long one the front short one to the back hold the body in place. The Zimo MS500N sound chip and a Minnow4 15x8x4.5 speaker from https://www.youchoos.co.uk/ only have the speaker wires (purple) the remaining wires were removed. The Minnow4 slips in-between the gear tower and PCB riser, it is necessary to shorten the pins on the MS500 to 4 millimetres long pin 1 is to the right as you look down it is marked, and wrap the chip with 20 mm Kapton tape other than that it’s plug and play.


SECR P Class 0-6-0T 323 'Bluebell' sound fitting.

 My Hatton’s now Accurascale ‘Bluebell’ is now fitted with a Zimo MS500N sound chip and a Minnow 4speaker from https://www.youchoos.co.uk/. Except for the speaker wires (purple) the remaining wires were removed.

Remove 4 screws from the chassis to release the body there 2 at the front 2 at the rear. The speaker fits in the Left hand side of the chassis after removing the small weight I stuck a sliver of 1 mm plastic card to insulate the speaker from the cast chassis.


It was necessary to remove approximately 3 millimetres from the cast chassis where the chip would fit this was to enable sufficient clearance I also deepened the slot where the interface board sits pin 1 is to the top of the board. I machined mine in a milling machine and deepened the slot with a hacksaw; the casting is quite robust holding it in a vice gently was not an issue so carefully cut it away with a hacksaw is a possibility. 


Finally I lined newly milled area with 1 mm plastic card to insulate the chip from the chassis. It is necessary to shorten the pins on the MS500 to 4 millimetres long and wrap the chip with 20 mm Kapton tape. The Minnow4 15x8x4.5 is held in place on the plastic card with double sided tape.


Sunday, 9 March 2025

Hornby Sentinel 0-6-0 sound fitting.

 Hornby Sentinel 0-6-0 sound fitting.

Another straight forward conversion first remove the 4 body fixing screws, the body just pulls away mine was a little tight. I trimmed the orange and white wires again sealing the end with a short length of heat shrink tube.

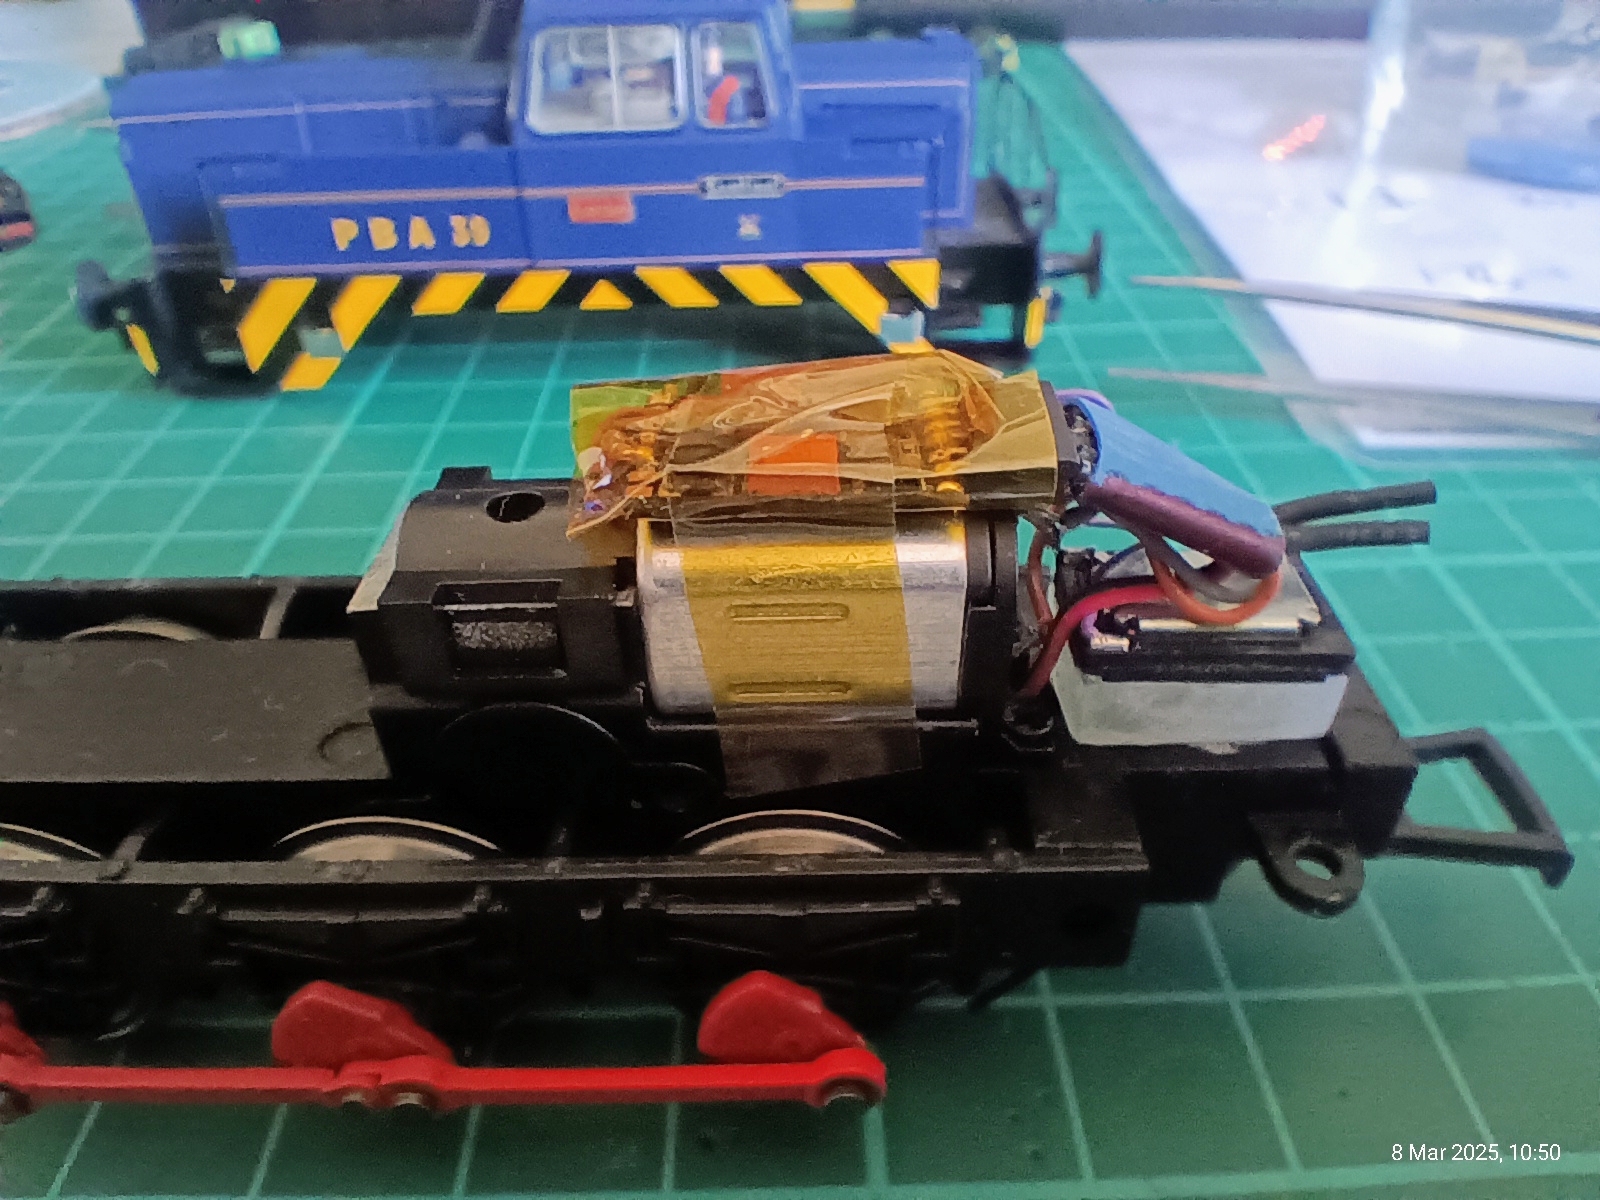
This time I chose the Zimo MS500N sound chip and a Microcube 12x8x7 speaker this fits nicely behind the motor held with double sided tape. Wrapping the chip with 20mm wide Kapton tape. Carefully position the wrapped chip on top of the motor again secured using Kapton tape, once again no major surgery to the model.


Saturday, 8 March 2025

Bachmann GWR Class 56xx sound fitting

This is a quite straight forward exercise first remove the NEM pockets to reveal the body fixing screws, the body just pulls away.


I opted for firebox glow this time the backhead is glued to the chassis you need to gently prise the backhead away off the chassis mine broke off the locating pins (easy fix just drill out the broken part in the chassis and fit a new pin into the back head of course you will have to carefully drill a hole for it I used a 1.5 mm drill) make a hole in the firebox doors I suggest 2.5mm to allow the glow from the LED to show. Glue to cables to the back of the back head and cover the LED with blacktack and reattach to the chassis.


I chose the Zimo MS480R sound chip and a Sugarstrand 25x09x06 speaker. It is necessary to unsolder the green and blue wires from the 8 pin plug these are connected to the fire box glow LED with a 1K resistor in the blue wire. Due to the limited space cut back the stayalive wires sealing the end with a short length of heat shrink tube. Attach the speaker to the flat plate in front of the backhead with double sided tape. 


Plug in the chip and tidy the wires over the chip and secure with Kapton tape. A simple and elegant installation with no major surgery to the model except the 2.5 mm hole!

Wednesday, 18 December 2024

Dapol Class 121Slipping Drive

 18/12/2024

This is the second time the drive shafts have failed! The knuckle on the end of the shaft just slips. Unfortunately there are no spare parts available at the time of writing. Fortunately I have the old set from the previous failure I cleaned the parts in isopropyl alcohol run a triangular needle file across the mating portion of the shaft and glued the knuckle with cyanoacrylate. That didn’t work Dapol will supply them on an exchange basis. So the loco and the defective drive shafts are going back after the holidays


 UPDATE

Replacement drive shafts have arrived back; I’m glad to see that the design has been changed. To my mind this is a much better design.


Sunday, 15 December 2024

Restoration and rebuild of Western Hills station part 2


I Sprayed the completed lights poles with Halfords rattle can Rover Damask red which is a close proximity to LMS maroon, next is to fit all those fiddly little LEDs. Meanwhile I've sprayed 18 GWR style platform benches from model railway scenes with Halfords rattle can Rover Russet brown a close proximity to GWR chocolate.


Saturday, 14 December 2024

Restoration and rebuild of Western Hills station


14/12/2024

 Continuing with the restoration and rebuild of Western Hills station I needed some station lights I have a bag full of cheap and cheerful eBay station platform lightswhich are a scale height of around 10 feet. They just don't look right so I decided to use evergreen plastic extrusions to fabricate some new lights. They will be a scale height of around about 14 feet I commenced by cutting 3/32 inch round tube to 67 millimetres long for the pole next I need a base so I used 1/8 inch square tube bored out to 3/32 inch to length of 15 millimetres lastly a collar made from 1/8 tube two millimetres long again bored out to 3/32 inch.


Assembly quite straight forward slide the square base up the tube leaving 15 millimetres protruding.  Slide the collar on the top leaving around 2 millimetres protruding run liquid cement around the joints. The next task is to disassemble the cheap and cheerful Chinese lights. All we need to keep is the globe and the top cover. I cut the spigot off the top cover which allows them to come away from the pole.

For the light source I used miniature micro LED’s type 0402 pre-wired from eBay they are so very tiny.


Thursday, 12 December 2024

Bachmann Webb Coal Tank 7841 sound fitting


 10/12/2024

7841 is now fitted with a Zimo MS581N18G sound chip and a Sugar Cube SCUBE8 from https://www.youchoos.co.uk/. The speaker fits in the space beneath the bunker after removing the spacer! It must have spring clips (not solder pads) there is no wiring just plug and play. I took the opportunity to fit some crew from the modelu range the terrier crew fits into the cab nicely.


Friday, 29 November 2024

Bachmann Webb Coal Tank 7841

 27/11/2024

Pix Valley announce their latest arrival, in pristine condition after another extensive overhaul into full running order Bachmann Webb Coal Tank 7841 its fitted with a LaisDcc Next 18 chip. A little jigging around with the CV’s it is running exceptionally well. It will be due for a sound upgrade when funds permit.


Thursday, 28 November 2024

Kit built Webb Coal Tank 7821


23/11/2024 

A few weeks ago I was gifted a very well kit built Webb Coal Tank 7821, I always liked this locomotive. Unfortunately testing at home on DC it was apparent things were not quite right. The motor was hesitant to start and although the commutator was clean it was arcing and drawing over 2 amps! I scoured the internet for a replacement motor only to find a GEM unfinished kit selling for £125 + postage. However I stumbled on this locomotive on eBay  35-051 Bachmann Webb Coal Tank 7841 DCC fitted £75 free post.


Wednesday, 27 November 2024

Model Rail (Heljan) British Rail Class 11 shunter revisited part 2


11/11/2024


I am in the process of fitting ‘GoldCaps’ Energy Storage Capacitors to try to resolve the issue of stalling. This was the response from John at youchoos; “The simplest stay-alive to add to the MS581 is a pair of mini GoldCaps, connected in series.  The MS581 is designed to take those directly with no additional circuitry... has to be exactly 2 of the GoldCaps , no less, no more, to get the correct voltage (around 5V).”  I ordered the following KIT-YC1FGOLDCAP6 - 6x Mini GoldCaps 2.7V 1F. They arrived this morning two were joined in series and wrapped in Kapton tape. Then I set about modifying the control desk in the cab to accept the capacitors. Basically pop off the control desk it is held in place by two moulded pins and glue 40 thou strips of plastic strip on the mating faces repaint matt black and cut a slot in the bulkhead for the cables.  After testing on the rolling road what a difference no more stalling or glitch sound well worth the effort.


Monday, 11 November 2024

Model Rail (Heljan) British Rail Class 11 shunter revisited


28/10/2024

I’m not sure if I am just unlucky or there is an issue with quality control; I’m having issues with my class 11 loco; it’s fitted with a Zimo MS581N18 sound chip. Randomly it stops and the sound stops. This happens at various parts on my layout even on my 2 foot programming track a slight nudge sideways it starts to move however I have to turn on the sound. I suspect it is a pickup issue, but due to the position of the pickup wipers it is difficult to see them to ascertain if they are the culprits. The locomotive was returned to Kernow modelrail centre for attention. However a replacement was sent virtually by return although it was tested it still has issues randomly stopping after an initial run in for an hour and a half in each direction. I’m not 100% sure if the inside of the wheel sets are chemically blackened if the is the case this may be the cause of the stalling.


Saturday, 12 October 2024

Model Rail (Heljan) British Rail Class 11 shunter


Today on Pix Valley we are proud to announce our latest arrival, in pristine condition after extensive rebuild to full running order 12100 British Rail Class 11 shunter (the daddy of the 08 gronk) as normal procedure in Pix Valley it was run on the rolling road for 30 minutes in each direction before being chipped. Unfortunately I noticed that when running in the cab light didn’t work! Waved the magic wand till I was blue in the face LOL I selected a Zimo MS581N18 sound chip from https://www.youchoos.co.uk/ using the Class 08 sound file as both locomotive share the same English Electric 6KT engine. Installation is very straight forward two screws behind the side tool boxes release the body taking care to tease it up as its very tight fit. The cab light issue was down to one of the bronze tabs detached from the keeper plate screwed to the under side of the roof moulding. A spot of cyanoacrylate solve the issue.  Fit the MS581 after the blanking plug was removed there is a built in speaker on the PCB all that remains was to replace the body shell that’s it job done. Due to the orientation of the chip to clear the cab light pad it was necessary to set the decoder to reverse polarity, CV’s were tweaked to

CV 2 Start Voltage 5
CV 3 Acc Momentum 20
CV 4 Dec Momentum 15
CV 5 Top Voltage 0
CV 6 Mid Voltage 0      
CV29 reverse direction 39
CV266 Volume 75


Thursday, 23 May 2024

D8015 British Rail Class 20/0 (English Electric Type 1)


20/05/2024

Today on Pix Valley we are proud to announce our latest arrival, in pristine condition after extensive rebuild to full running order D8015 British Rail Class 20/0 (English Electric Type 1) as normal procedure in Pix Valley it was run on the rolling road for 30 minutes in each direction before being chipped. I selected a Zimo MX645PluX22 sound chip from https://www.youchoos.co.uk/.

Installation is very straight forward two screws under the NEM couplings release the body taking care as the lighting cables are attached to the PCB. Pop out the blanking plug and pop in the MX645 as there is a built in speaker pre-wired replace the body shell that’s all there is to do.

I may upgrade the speaker to a SugarCube24X15X7-2W t give a richer sound!


Wednesday, 24 April 2024

Percy from DC to DCC Part 2

Next up solder the four wires to the DCC NEM662 NEXT18 female socket to 14 wire adaptor PCB from BLW Technical Services Ltd on eBay.


With the chip connected I reprogrammed the address to 6 tested on the rolling road.I wrapped as I did with the Thomas conversion the PCB and chip in Kapton tape to protect the chip from short circuits

The chip sits nicely in the space under the coal load.